INTRODUCTION
The is the first of a two part series about our attempts to make rogue AP attacks against 802.11n and 802.11ac networks a bit easier. Up until this point, we haven’t really seen any serious attempts to provide out-of-the-box support for rogue AP attacks against 802.11ac and 802.11n. Considering that most modern wireless networks use these versions of the 802.11 standard, we decided to find out why and attempt to do something about the problem ourselves.
Part I of this series, which you are currently reading, is a direct followup to the talks we presented at Thotcon, HackWest, and BSides KC this year. It deals with background information and a detailed look at the challenges we faced when adding 802.11n support to EAPHammer. Part II of this series will contain information relevant to 802.11ac.
If you want to skip to the source code and PowerPoint slides, you can find them in the Conclusion at the end of this post.
BACKGROUND
Despite the fact that most modern networking hardware uses 802.11n or 802.11ac, existing tools for performing rogue AP attacks do not support these protocols at all, or only do so with extensive manual configuration. This poses a problem for penetration testers for a couple of reasons. To begin with, wireless security assessments are typically timeboxed. This means that time spent manually editing configuration files ultimately translates to lost value for the client. Setup time is equally problematic during red team engagements, since excessive time wasted onsite managing configurations by hand increases the risk of the operator being discovered and compromised.
The alternative to spending time manually configuring a rogue AP to use 802.11ac or 802.11n is to perform a rogue AP attack using an older hardware mode such as 802.11a or 802.11g. Although this can work, this is only a partial solution that still carries its own set of problems.
To understand why why 802.11g rogue access points are suboptimal for attacking 802.11n or 802.11ac networks, we need to review how 802.11n and 802.11ac differ from previous versions of the standard, as well as how rogue AP attacks work at a fundamental level.
Let’s start out by talking about rogue AP attacks a high level. There are multiple types of rogue access point attacks, but the one that works most reliably for attacking WPA2-EAP networks is known as an “Evil Twin” attack. In an Evil Twin attack, the attacker creates an access point with the same ESSID as the target wireless network. The attacker then forces one or more client devices to roam from the legitimate AP to the attacker’s rogue AP using one of the following methods:
- Entice a client to roam to the rogue AP by providing a superior signal
- Coerce a client to roam by denying access to the legitimate AP using deauthentication packets and providing the rogue AP as a working alternative
Enticing a client to roam from an 802.11n/ac AP to an 802.11g AP can be difficult, due to the vastly improved throughput offered by 802.11n and 802.11ac. Whereas 802.11g has a maximum throughput of 54 mbps, 802.11n offers a theoretical limit of 600-900 mbps [1]. In practice, 802.11n maxes out at around 300 mbps and the theoretical limit is rarely achievable [2] However, 300 mbps is still nearly six times the throughput offered by 802.11g. The newer 802.11ac, which builds off of 802.11n, offers even higher speeds [3]. This difference in throughput makes it very difficult to entice a client to roam from an 802.11n or 802.11ac access point to an 802.11g or 802.11a access point by providing a better signal except at very close ranges. This means that in practice, the only reliable way to use an 802.11g or 802.11a access point to attack an 802.11n or 802.11ac access point is to use deauthentication to coerce a client to roam to the rogue AP. However, even this strategy has its problems.
Consider the following animation, in which two laptop computers (shown center) are initially associated with an 802.11n access point operating on channel 161 (shown top left). A second 802.11n access point (shown top right) is located nearby. An attacker has created a rogue access point (shown bottom center) that operates using 802.11g. The attacker attempts to coerce the client devices to connect to the rogue AP by performing a deauthentication attack. In order to maintain a connection the wireless network, the two laptops must roam to either the rogue AP or the second legitimate AP. Since the rogue AP cannot provide a better connection than the second legitimate AP, the two laptops roam to the latter.
At this point the attacker is back to square one, and still has not been able to execute the evil twin attack with any success. Most enterprise wireless networks have more than one access point, so this problem is virtually unavoidable. As a matter of probabilistic certainly, the attacker may eventually get lucky and successfully get a client to connect to the rogue AP. However, waiting this for this to happen translates to anywhere between hours and days wasted trying to get the attack to work.
ADDING 802.11N SUPPORT TO EAPHAMMER
There were three primary challenges that we had to overcome in order to add 802.11n support to EAPHammer. These are:
- 802.11n Autoconfiguration
- Achieving 802.11h Compliance
- Circumventing BSS Overlap Protection
We’ll go over each of these in detail in the sections that follow.
802.11N AUTOCONFIGURATION
Creating a rogue AP using hostapd becomes markedly more complicated when newer protocols such as 802.11n are used. Consider the following screenshot, which contains a hostapd configuration file used to create a 802.11g access point.
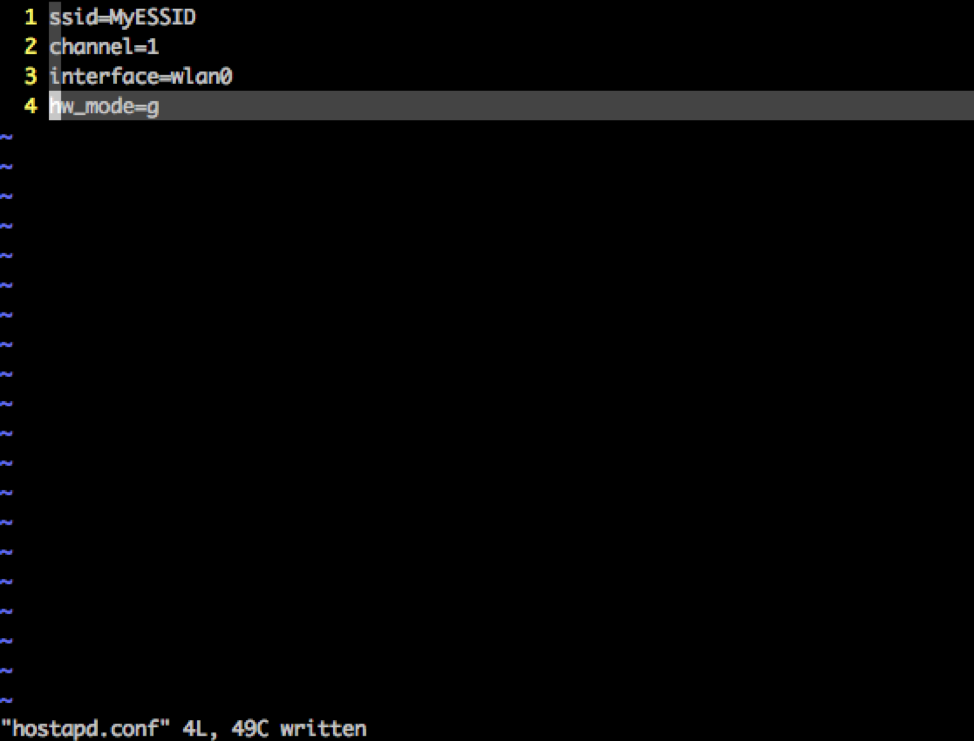
As you can see, we can use hostapd to create an open 802.11g access point using a simple four line config file. Now consider what it takes to create an 802.11n access point using hostapd.
We must:
- select a channel width (20 MHz or 40Mhz)
- select an operating channel
- possibly enable 802.11h/DFS depending on the operating channel and channel width we chose
- select a hardware mode that works with our chosen operating channel (either g or a)
- set our HT parameters correctly (there are quite a few of these)
- decide whether to allow non-HT connections to our HT access point, and under what circumstances
- select an appropriate number of spatial stream
- Bonus: if we chose a 40Mhz channel, we need to choose whether to place the secondary channel above or below the primary channel (whether a secondary channel is valid is context sensitive).
If any of these parameters are misconfigured, hostapd will either refuse to start, silently fail, or “correct” your choices by doing something you don’t want it to do (like dropping you back to 20MHz).
As you can see, configuring an 802.11n access point is as “simple” as knowing what configuration options to use in any given situation. It’s clearly beneficial to have a tool that intelligently handles this configuration for you, which is what we’ve done with EAPHammer.
We’ve strived to develop EAPHammer into a system that bridges the gap between providing a simple interface that can be used quickly in most situations, but that also provides the kind granular control that appeals to advanced users.
To create a rogue 802.11n AP using EAPHammer, all a user has to do launch the tool with the –hw-mode n flag as shown below:
./eaphammer -i wlan0 -c 161 --essid MyNetwork --creds --hw-mode n
Executing EAPHammer using the flags shown in the screenshot above will create an 802.11n rogue access point with a 20MHz channel width. All relevant configuration is handled silently in the background.
To create an 802.11n access point with a channel width of 40MHz, we just use the –channel-width flag as shown in the following command:
./eaphammer -i wlan0 -c 1 --essid MyNetwork --creds --hw-mode n --channel-width 40
This will cause EAPHammer to create a 40MHz channel and automatically select a valid secondary channel based on the specified primary channel.
To choose the location of the secondary channel manually, advanced users can use —ht40 the following override flag as shown below:
./eaphammer -i wlan0 -c 1 --essid MyNetwork --creds --hw-mode n --channel-width 40 --ht40 plus
In fact, most of EAPHammer’s automatically configured parameters can also be set manually in this way. We’ve also added a method for loading a configuration file manually in response to feedback from our users.
ACHIEVING 802.11H COMPLIANCE
Approximately 50% of the 5GHz spectrum is shared by radar and satellites [4]. Since this includes critical communication systems such as airplane radar, both US and EU regulations mandate that access points be able to detect and avoid radar pulses when operating on these shared channels [5]. IEEE’s response to these regulations was to introduce 802.11h, an amendment to 802.11 that adds Dynamic Frequency Selection (DFS) and Transmit Power Control (TPC) to the channel [6].
In order to attack access points that use these channels without causing unwanted interference, we need to make sure we configure our rogue AP to enable 802.11h. We’ve added a flag to EAPHammer that does this. You’ll still have to install the relevant kernel modules for 802.11h itself to work, but once you get that squared away we’ve made the rest of the process pretty painless.
CIRCUMVENTING BSS OVERLAP PROTECTION
Take a look at the screenshot below. You’ll notice a python script that’s being executed from the command line, as well as some output that looks like it might come from hostapd.
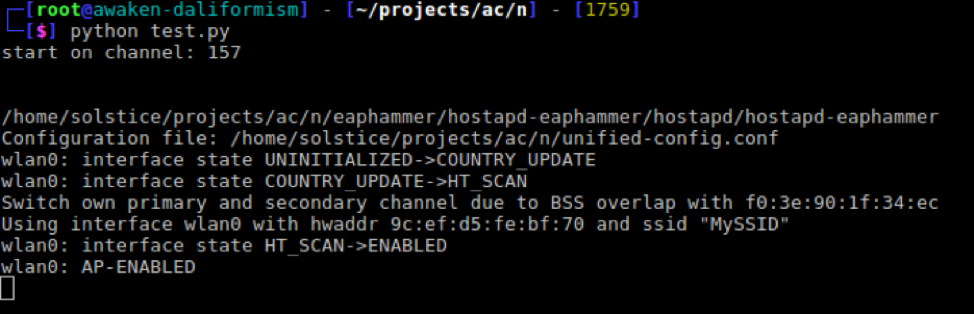
This is screenshot of a unit test that was performed during the development of EAPHammer’s 802.11n capabilities. The test.py file is a prototype script that attempts to create a 40 MHz wide 802.11n access point using hostapd. The selected primary channel is 157, and the ESSID is set to “MyESSID”.
The fifth line of console output after running the script contains the following error message:
“Switch own primary and secondary channel due to BSS overlap with f0:3e:90:1f:34:ec
What’s happening is that hostapd has detected that either its primary or secondary channel overlaps with a one used by a neighboring AP. In order to reduce performance degradation due interference, the 802.11n protocol states that neighboring access points may not use overlapping channels [1]. In order to be 802.11n compliant, access points must check for overlaps on startup and fall back to a 20 MHz channel width if one is detected [1].
This feature makes sense from an engineering perspective, but it also prevents us from creating 40Mhz rogue APs on the same channels as our targets, which is pretty detrimental to successfully execute evil twin attacks.
Fortunately, this requirement is an engineering standard, rather than regulatory standard. This means that unlike 802.11h, we’re allowed to work around it.
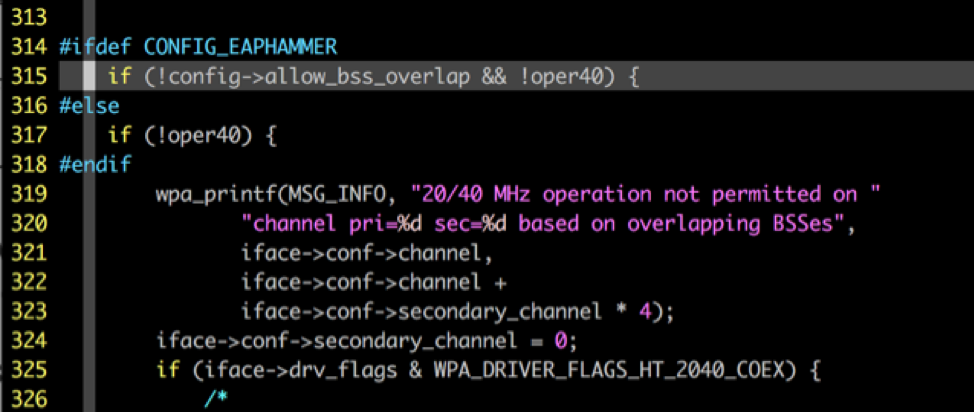
Patching hostapd to ignore BSS conflicts turns out to be relatively simple. The utility only checks for BSS conflicts on startup, so getting the functionality we need is as simple as tracking down these blocks of code that implement this functionality and removing them [7].
Even better: there are numerous publicly released patches for removing hostapd’s BSS protection already available [7][8]. We used logic from a hostapd 2.6 patch written by Mike Kazantsev (thanks Mike!) [7]. Mike’s patch is pretty simple: just a few lines of code spread across the following two files [7]:
- src/ap/hw_features.c
- src/common/hw_features_common.c
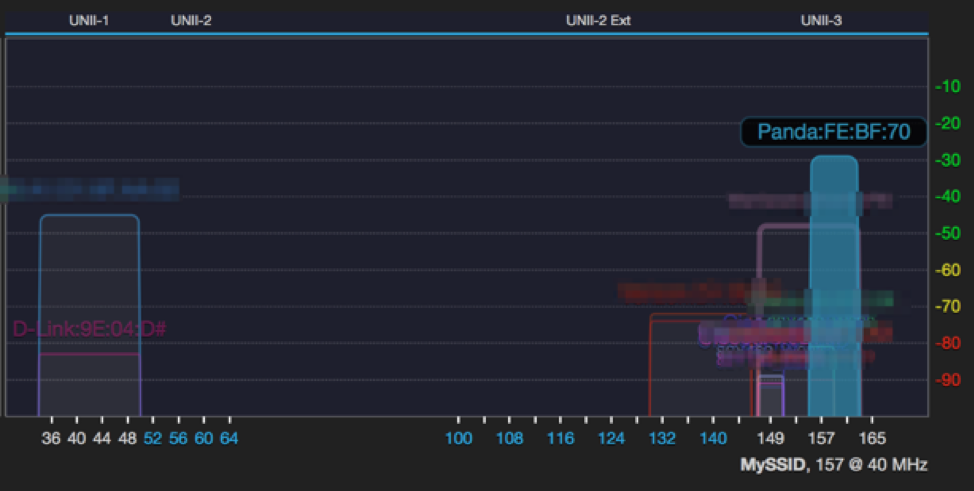
We tweaked Mike’s patch a bit so that BSS Overlap Protection can be toggled on or off rather than disabled completely, as you can see in the following screenshot:
Once we added this functionality to EAPHammer, we were able to successfully able to circumvent BSS Overlap Protection as shown in the following spectrum graph:
CONCLUSION
In conclusion, we’ve added the following features to EAPHammer:
- Out of the box support for 802.11n (ac comes next)
- Out of the box support for 5Ghz rogue access points using 802.11a and 802.11n
- Support for WMM
- Support for 802.11h
We’ve done so in a way that ensures that minimal manual configuration needed, but also leaves for granular configuration by advanced users. In doing so, we hope to have made the process of pentesting 802.11n networks a bit easier for the rest of the security community.
You can check out the powerpoint slides from our presentation at THOTCON, HackWest, and BSides KC here:
You can also check out the tool and source code on Github:
https://github.com/s0lst1c3/eaphammer
References:
[1] https://ieeexplore.ieee.org/document/5307322/
[4] http://www.radio-electronics.com/info/wireless/wi-fi/80211-channels-number-frequencies-bandwidth.php
[5] https://www.networkworld.com/article/2323593/tech-primers/802-11h-helps-wlans-share-spectrum.html
[6] https://ieeexplore.ieee.org/document/1243739/
[7] http://blog.fraggod.net/2017/04/27/wifi-hostapd-configuration-for-80211ac-networks.html
[8] https://www.brunsware.de/blog/gentoo/hostapd-40mhz-disable-neighbor-check.html